New Customer Creation Process
Overview
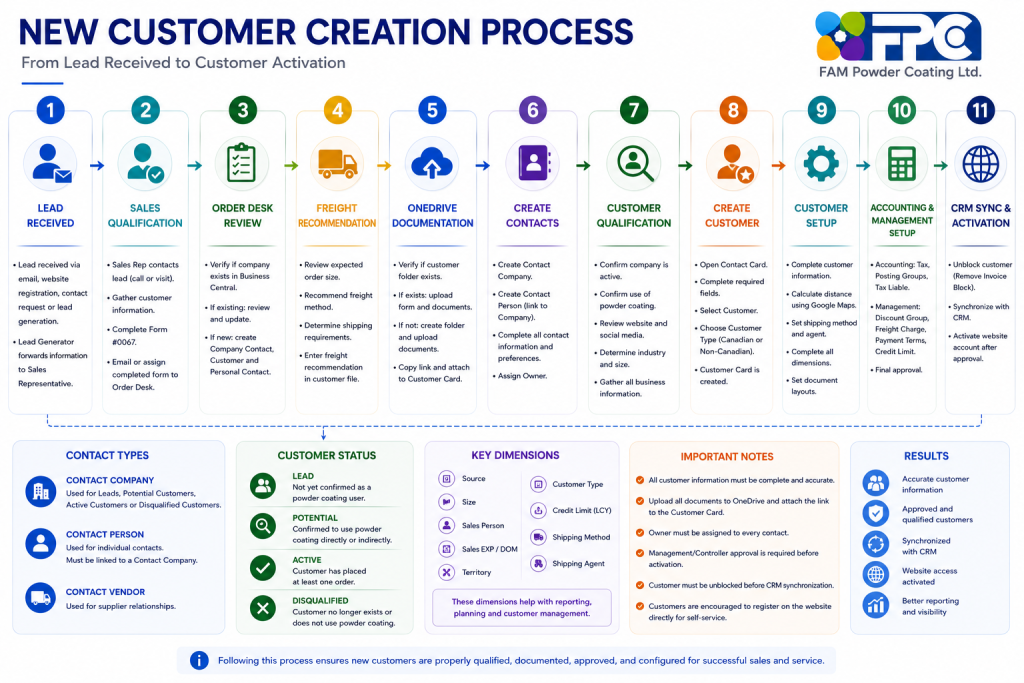
The New Customer Creation Process ensures that all new leads, contacts, and customers are properly qualified, documented, approved, and configured in Microsoft Dynamics 365 Business Central before sales activities begin.
This process involves:
- Lead Generation
- Sales Team
- Order Desk
- Accounting
- Management / Controller
The objective is to ensure customer information is complete, accurate, and approved before activation.
Learning Objectives
After completing this lesson, users will be able to:
✓ Process a new customer request
✓ Create Contacts and Customers in Business Central
✓ Complete required customer information
✓ Upload customer documentation
✓ Configure dimensions and document layouts
✓ Complete customer qualification
✓ Synchronize Business Central with CRM
✓ Obtain required approvals
✓ Activate customers correctly
Step 1 – Lead Received
A lead may be received through:
- Customer Email
- Website Registration
- Website Contact Request
- Lead Generation Activities
- Existing Lead Follow-Up
The Lead Generator forwards the lead information to the appropriate Sales Representative.
Step 2 – Sales Representative Qualification
The Sales Representative must:
- Contact the lead
- Call or visit the prospect
- Gather customer information
- Complete Form #0067
- Email or assign the completed form to Order Desk
Required information includes:
- Company Name
- Address
- Contact Person
- Phone Number
- Email Address
- Industry
- Estimated Order Size
Step 3 – Order Desk Review
Order Desk must verify whether the company already exists in Business Central.
Existing Contact Found
If the contact already exists:
- Review existing information
- Compare with Form #0067
- Update records as required
New Contact
If the contact does not exist:
Create:
- Company Contact
- Customer Record
- Personal Contact
in Business Central.
Step 4 – Freight Recommendation
Order Desk reviews expected order size.
Based on estimated volume:
- Recommend freight method
- Determine shipping requirements
- Enter freight recommendation into the customer file
Step 5 – OneDrive Documentation
Verify whether a customer folder already exists in OneDrive.
Folder Exists
- Upload customer form
- Upload supporting documents
Folder Does Not Exist
- Create customer folder
- Upload documents
After upload:
- Copy folder link
- Attach OneDrive link to Customer Card in Business Central
Step 6 – Creating Contacts
Business Central supports three Contact Types:
Contact Company
Used for:
- Leads
- Potential Customers
- Active Customers
- Disqualified Customers
Contact Person
Used for individual customer contacts.
Every Contact Person must be linked to a Contact Company.
Contact Vendor
Used for supplier relationships.
Contact Information Requirements
For all Contact Persons complete:
- Contact Name
- Email Address
- Phone Number
- Cell Number
- Job Responsibility
- Organizational Level
- Contact Preference
Contact Preference
This field determines communication permissions.
Examples:
- Email Allowed
- Phone Allowed
- Visit Allowed
- Do Not Email
Always review before contacting customers.
Customer Status
Complete Customer Status for all contacts.
Lead
Not yet confirmed as a powder coating user.
Potential
Confirmed to use powder coating directly or indirectly.
Active
Customer has placed at least one order.
Status updates automatically.
Disqualified
Customer no longer exists or does not use powder coating.
Owner Assignment
Every contact must have an Owner.
The Owner is responsible for:
- Customer follow-up
- Relationship management
- Opportunity development
No contact should remain without an assigned owner.
Step 7 – Customer Qualification
Before creating or activating a customer:
- Contact customer directly
- Confirm company is active
- Confirm customer uses powder coating
- Review website and social media
- Determine customer industry
- Determine customer size
- Gather business information
Management Approval
Collected information must be submitted to:
- Touraj
- Ansari
Approval is required before:
- Customer Creation
- Website Activation
Step 8 – Create Customer from Contact
To convert a Contact into a Customer:
- Open Contact Card
- Complete required fields
- Select Customer
- Choose Customer Type
Options:
- Canadian Customer
- Non-Canadian Customer
The Customer Card will be created automatically.
Step 9 – Customer Card Setup
Sales Team completes:
Customer Information
- Address
- Phone Number
- Website
- Fax Number
Distance
Use Google Maps.
Measure distance between:
- FAM Powder Coating
- Customer Location
Shipping Information
Complete:
- Shipping Method Code
- Shipping Agent Code
Select the best shipping method for the customer.
Customer Dimensions
Sales Team must complete:
Source
How customer was found.
Examples:
- Website
- Google Search
- Referral
- Sales Call
Size
Examples:
- Small
- Medium
- Large
Sales Person
Assigned sales representative.
Sales EXP / DOM
- Domestic (Canada)
- Export (Outside Canada)
Territory
Assigned sales territory.
Customer Type
Examples:
- Custom Coater
- Metal Fabricator
- Manufacturer
Credit Limit (LCY)
Estimated credit requirement.
Document Layout Setup
Required for customer communications.
Steps:
- Open Customer Card
- Open Document Layout
- Select Copy From Report Selection
- Enter Customer Email in Send To Email
Business Central uses this address when sending:
- Statements
- Quotes
- Orders
- Reports
Step 10 – Accounting Setup
Accounting completes:
- Tax Area Code
- Tax Liable
- Customer Posting Group
- General Business Posting Group
Step 11 – Management / Controller Setup
Management or Controller completes:
- Customer Discount Group
- Customer Freight Charge
- Payment Terms
- Credit Limit
Sales Team should provide recommendations in comments.
Management makes final decisions.
Customer Unblock
After setup is complete:
Change Customer Block Status:
From:
Invoice
To:
Blank
This activates the customer.
CRM Synchronization
The synchronization will be automatically occur every 30 minutes, if you want to do it manually:
Customer must be unblocked before synchronization.
Steps:
- Open Customer Card
- Select Synchronize
- Select Set Up Coupling
- Enable Create New
- Select OK
If Create New is disabled:
The customer already exists in CRM.
Website Activation
Customers may register directly through the website.
Preferred method:
Customer completes registration independently.
Benefits:
- Customer enters own information
- Customer manages own password
- Less manual work
For manual activation:
- Confirm customer uses powder coating
- Obtain approval from Touraj or Ansari
- Activate website account
Best Practices
✓ Always verify customer qualification
✓ Complete all contact information
✓ Assign an owner
✓ Upload documents to OneDrive
✓ Attach OneDrive links to Business Central
✓ Complete all dimensions
✓ Verify customer approval
✓ Synchronize with CRM
✓ Activate website account only after approval
Lesson Summary
After completing this lesson, users should be able to:
✓ Process new customer requests
✓ Create contacts and customers
✓ Complete customer setup
✓ Configure dimensions
✓ Configure document layouts
✓ Complete accounting setup
✓ Obtain approvals
✓ Synchronize with CRM
✓ Activate customers properly